Home Assistant is a fantastic software suite that can be used to integrate practically anything you can think of into your smart home. It’s not just devices either; from cheap, ESP32-based displays to game servers and more, chances are that if it exists, you can pull data from it to Home Assistant somehow. One of the first automations I configured in Home Assistant was a simple automation to turn on my light in my room when my alarm goes off in the morning, and now I’ve taken that and used it to communicate something very important first thing in the morning: the weather.
I live in Ireland, and especially during the summer, the weather can be very changeable. We can have rain and thunderstorms one day, followed by a heatwave the next. It can be hard to keep on top of, and sometimes I end up surprised when I go outside thinking it was going to be a sunny or, at best, overcast day, only to find that it’s actually pouring rain. I check the weather when I remember (which isn’t always), so I brainstormed what ways would work for me… and I found my answer.
While my approach to turning on a light is what works for me, I’ll walk you through how I pulled it off so that you can modify it to suit your needs. It’s fairly simple, and it’s only the last step of the automation that will change for you depending on what you think will work for you.
Related
I replaced Google Home with Home Assistant and a local LLM, and I’m not looking back
I’ve almost retired Google entirely in my home.
Pulling our weather data
Plenty of integrations to choose from
The first thing we need to do is identify where our data will come from. There’s a fantastic weather integration called AccuWeather that you can use with Home Assistant, but I personally use Pirate Weather. It looks great, works perfectly, and is dead simple to use with basically any integration. Most of my automations use Pirate Weather, even though I pull some basic information for my dashboard using AccuWeather.
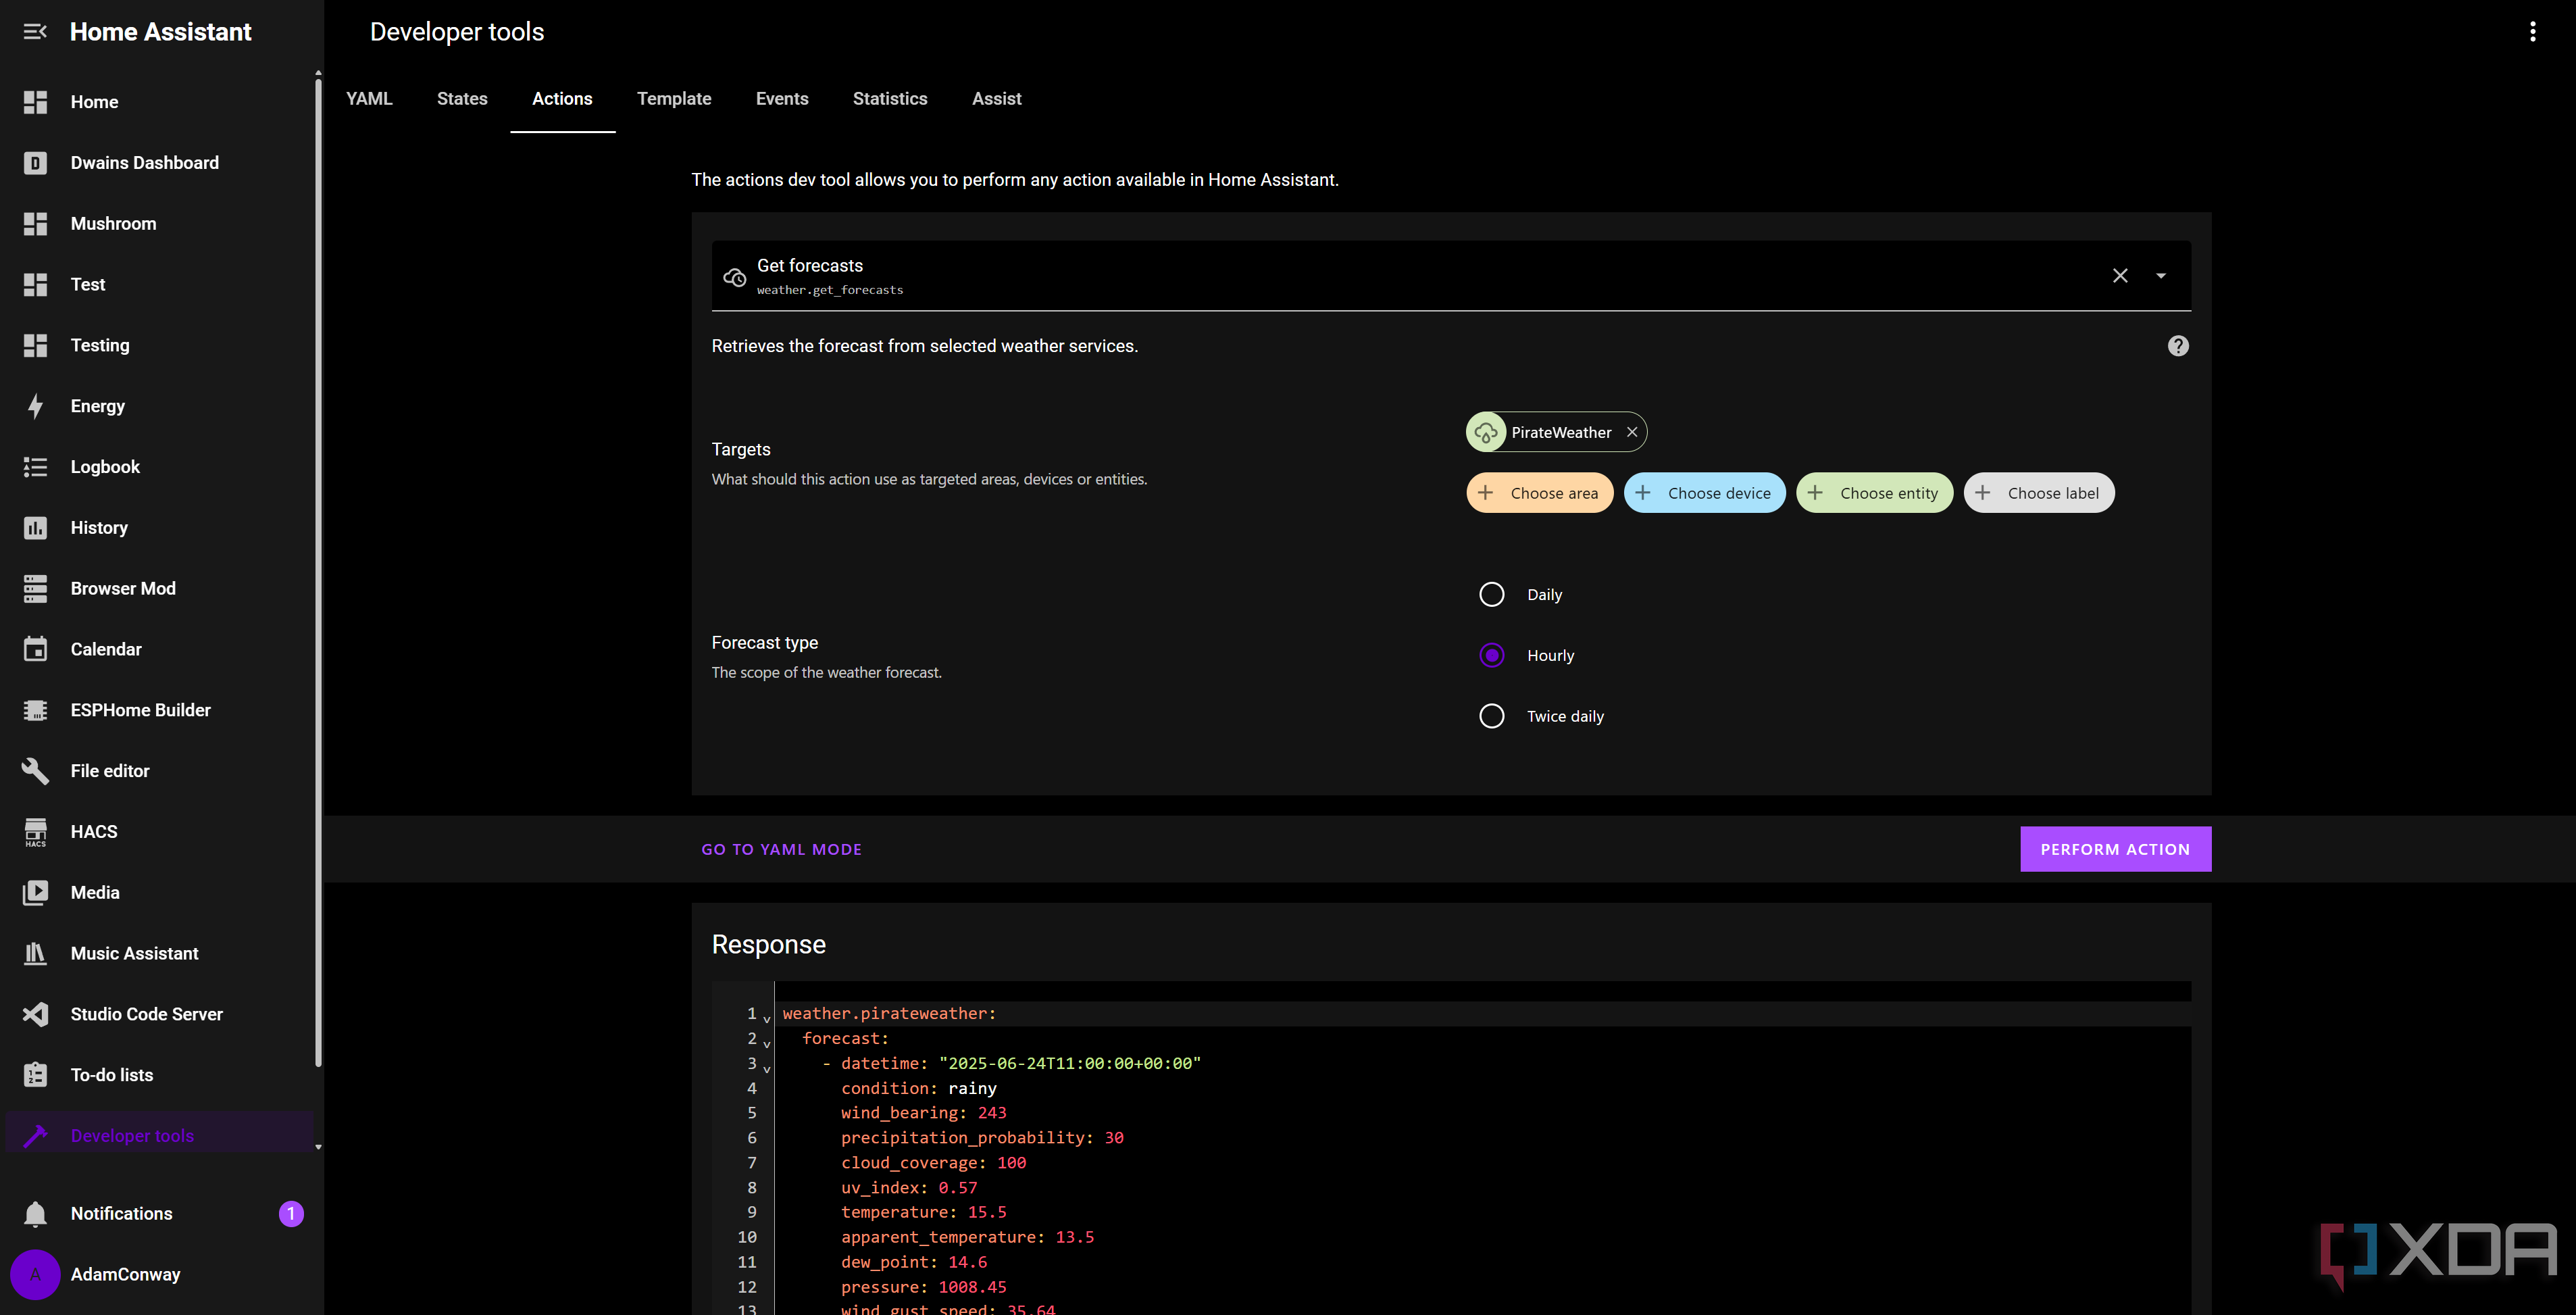
Once you’ve decided on your weather provider of choice, you’ll need to find out how the data is structured. Pirate Weather exposes a single entity called “weather.pirateweather”, and we’ll need to use the built-in “weather.get_forecasts” function in Home Assistant to work out what the data will look like. We’ll want to ensure that we’re using the right data for the right day and figure out how to access specific portions of the data.
Thankfully, Pirate Weather makes this easy, too. We can see the data is stored like this:
weather.pirateweather:
forecast:
- datetime: "2025-06-24T11:00:00+00:00"
condition: rainy
The “condition: rainy” is the part that we care most about, so how do we access it specifically and ignore the rest of the data? Well, the “forecast” key has multiple options, split up by “datetime”, as it returns a daily forecast. We only care about the first instance, as that’s today‘s forecast. Therefore, we can access it with [‘weather.pirateweather’][‘forecast’][0].condition, which will retrieve just the value of the “condition” variable for the first day.
This will differ depending on integration. Some integrations, like AccuWeather, will split this up into multiple sensors that can be accessed in an easier way. AccuWeather has “sensor.home_condition_day_0”, although you can also poll AccuWeather’s “weather.home” (or whatever it’s called in your instance) sensor’s state, as this will contain the current conditions as well, and attributes with more data. Either way, getting the data you need is easy, though it’ll change the mapping that we’ll get on to next.
Mapping our conditions to RGB values
And creating a helper to hold the current condition
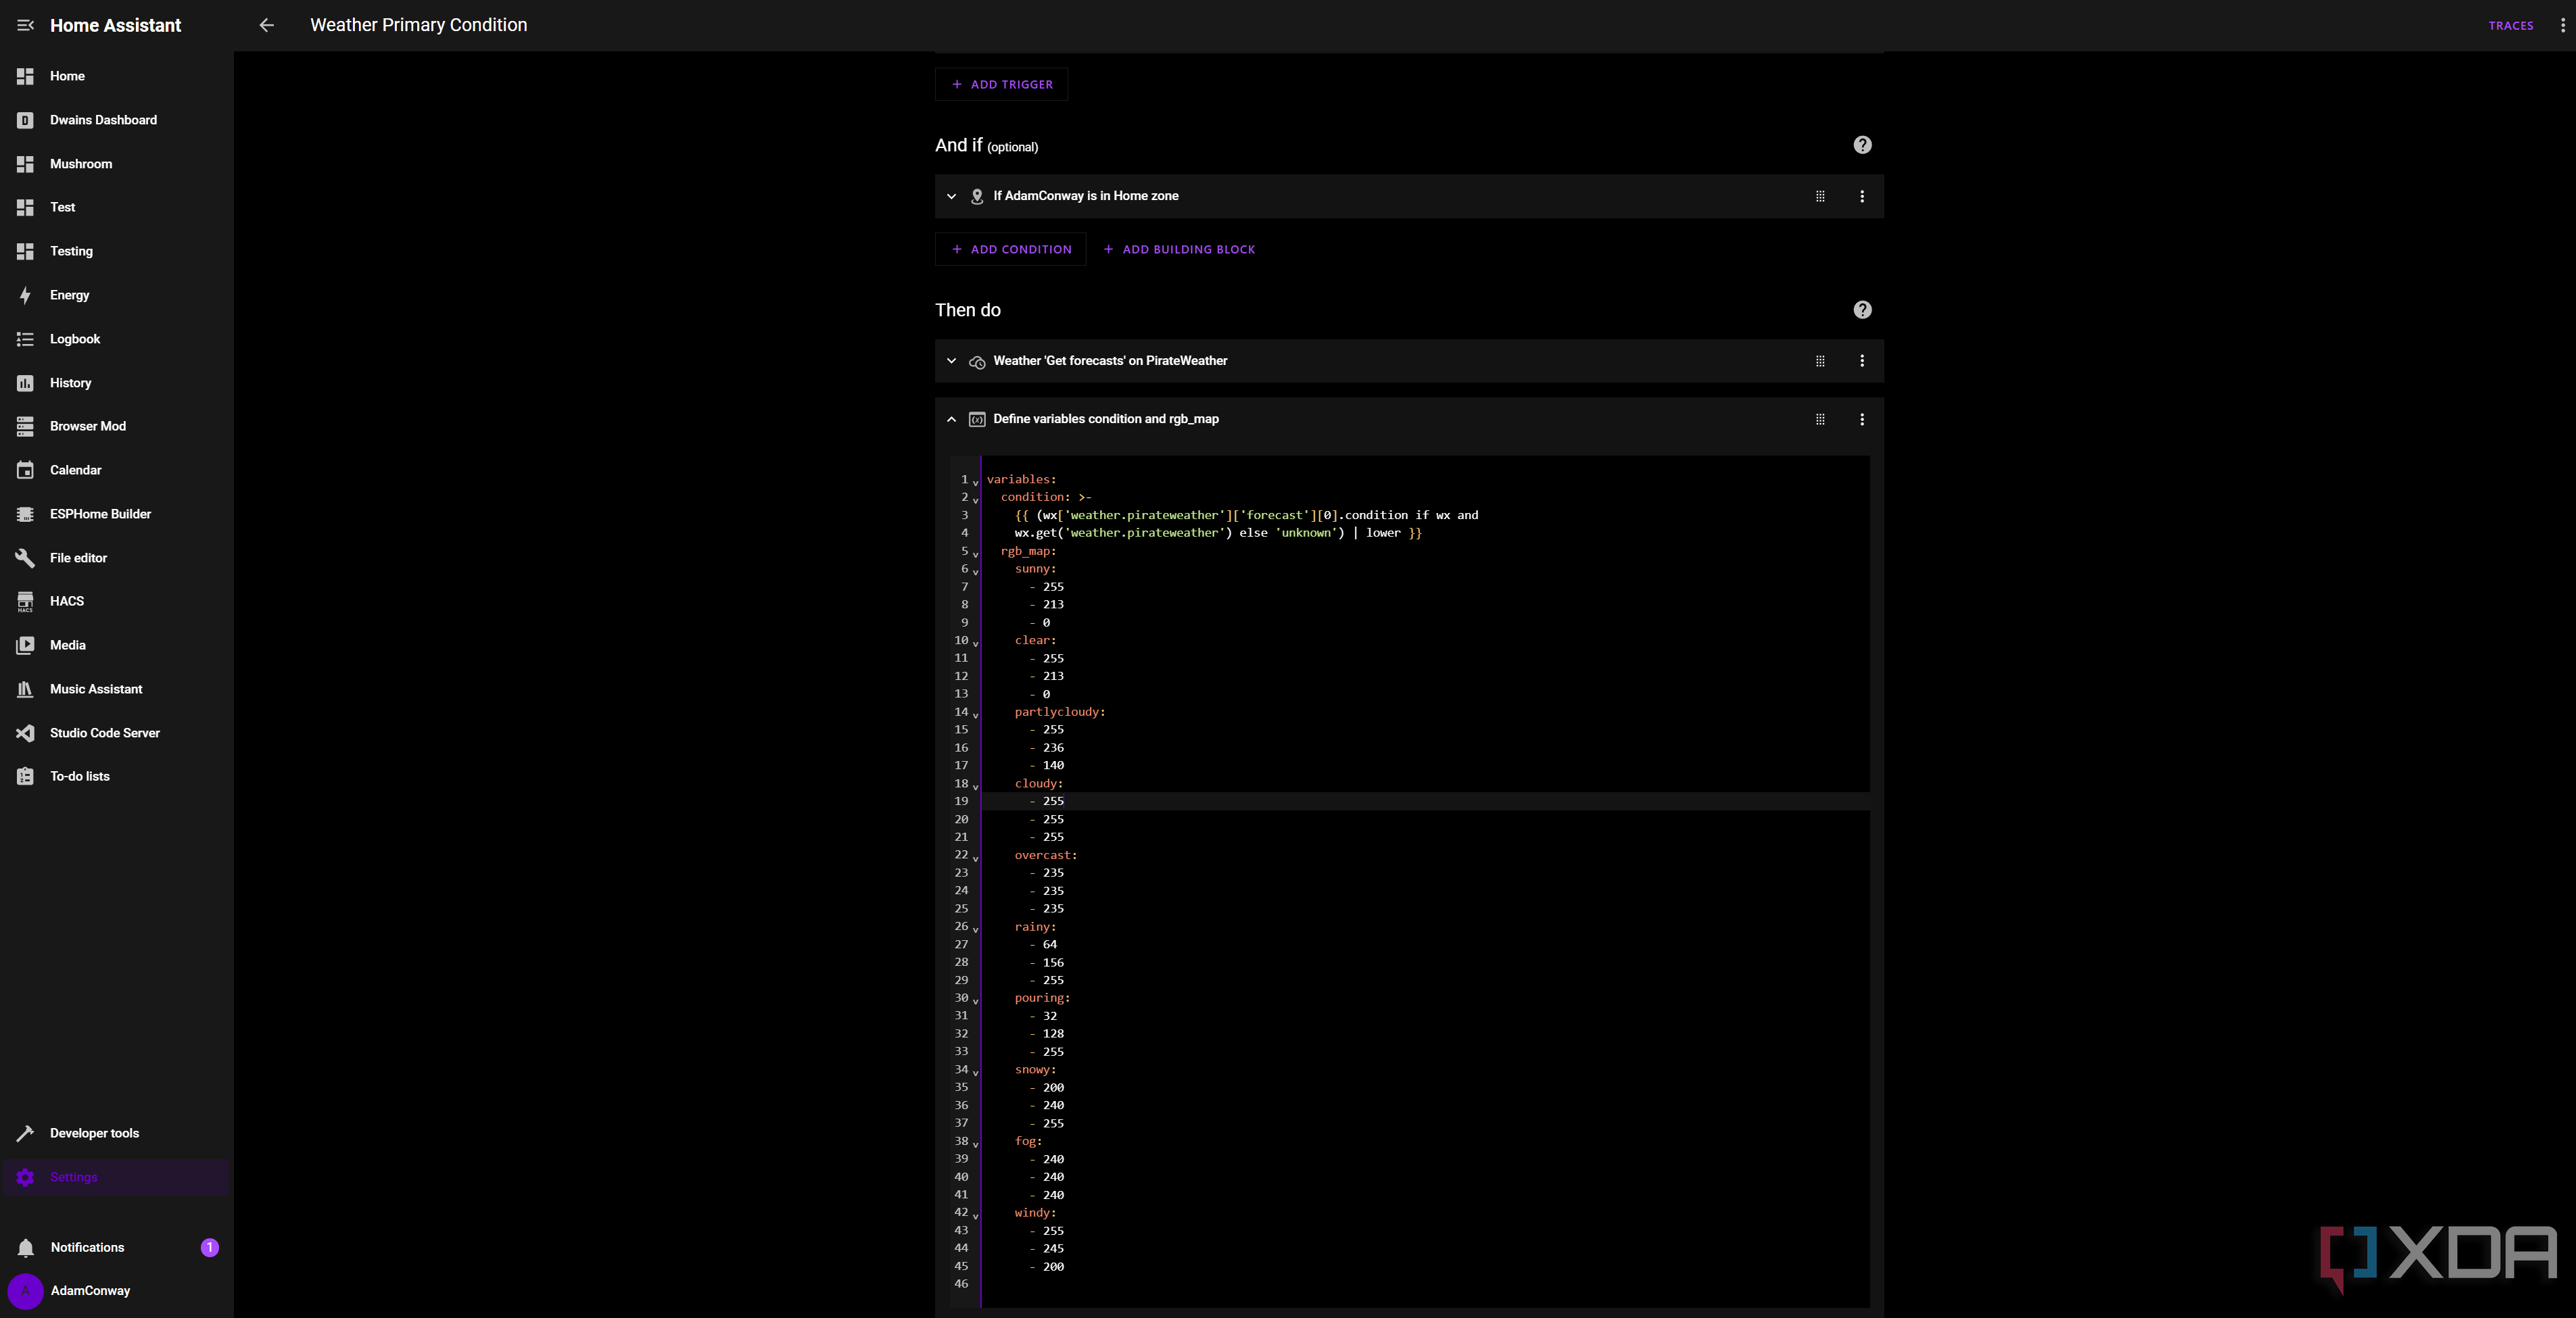
Next, we’ll need to design a map to associate weather conditions with colors that we’ll want to use on our light. These conditions will depend on what your integration reports, but here’s what Pirate Weather can report and will be mapped to a Home Assistant internal weather value. I have also provided my RGB values that I use. Sunny and clear currently use the same value, though I will be changing this, and I still need to add hail, lightning, and a couple of others, too.
- Sunny: Warm Yellow (255, 213, 0)
- Clear: Warm Yellow (255, 213, 0)
- Partlycloudy: Pale Straw (255, 236, 140)
- Cloudy: Neutral White (255, 255, 255)
- Overcast: Soft Grey (235, 235, 235)
- Rainy: Sky Blue (64, 156, 255)
- Pouring: Deep Sky Blue (32, 128, 255)
- Snowy: Icy Blue-White (200, 240, 255)
- Fog: Light Grey (240, 240, 240)
- Windy: Cream (255, 245, 200)
Finally, we’ll also need to create a helper variable to hold the current condition. This isn’t strictly necessary, but I find that it helps for debugging and is also something that you can put in a tile on your dashboard for a quick weather glance if you just want a single word that reports it.
To do this, go to Settings, Devices & Services, Helpers, and create a new Text helper. You don’t need to set any values, just give it a name and note the entity ID. We’ll use it in our automation.
Creating our automation
Defining a trigger and an action
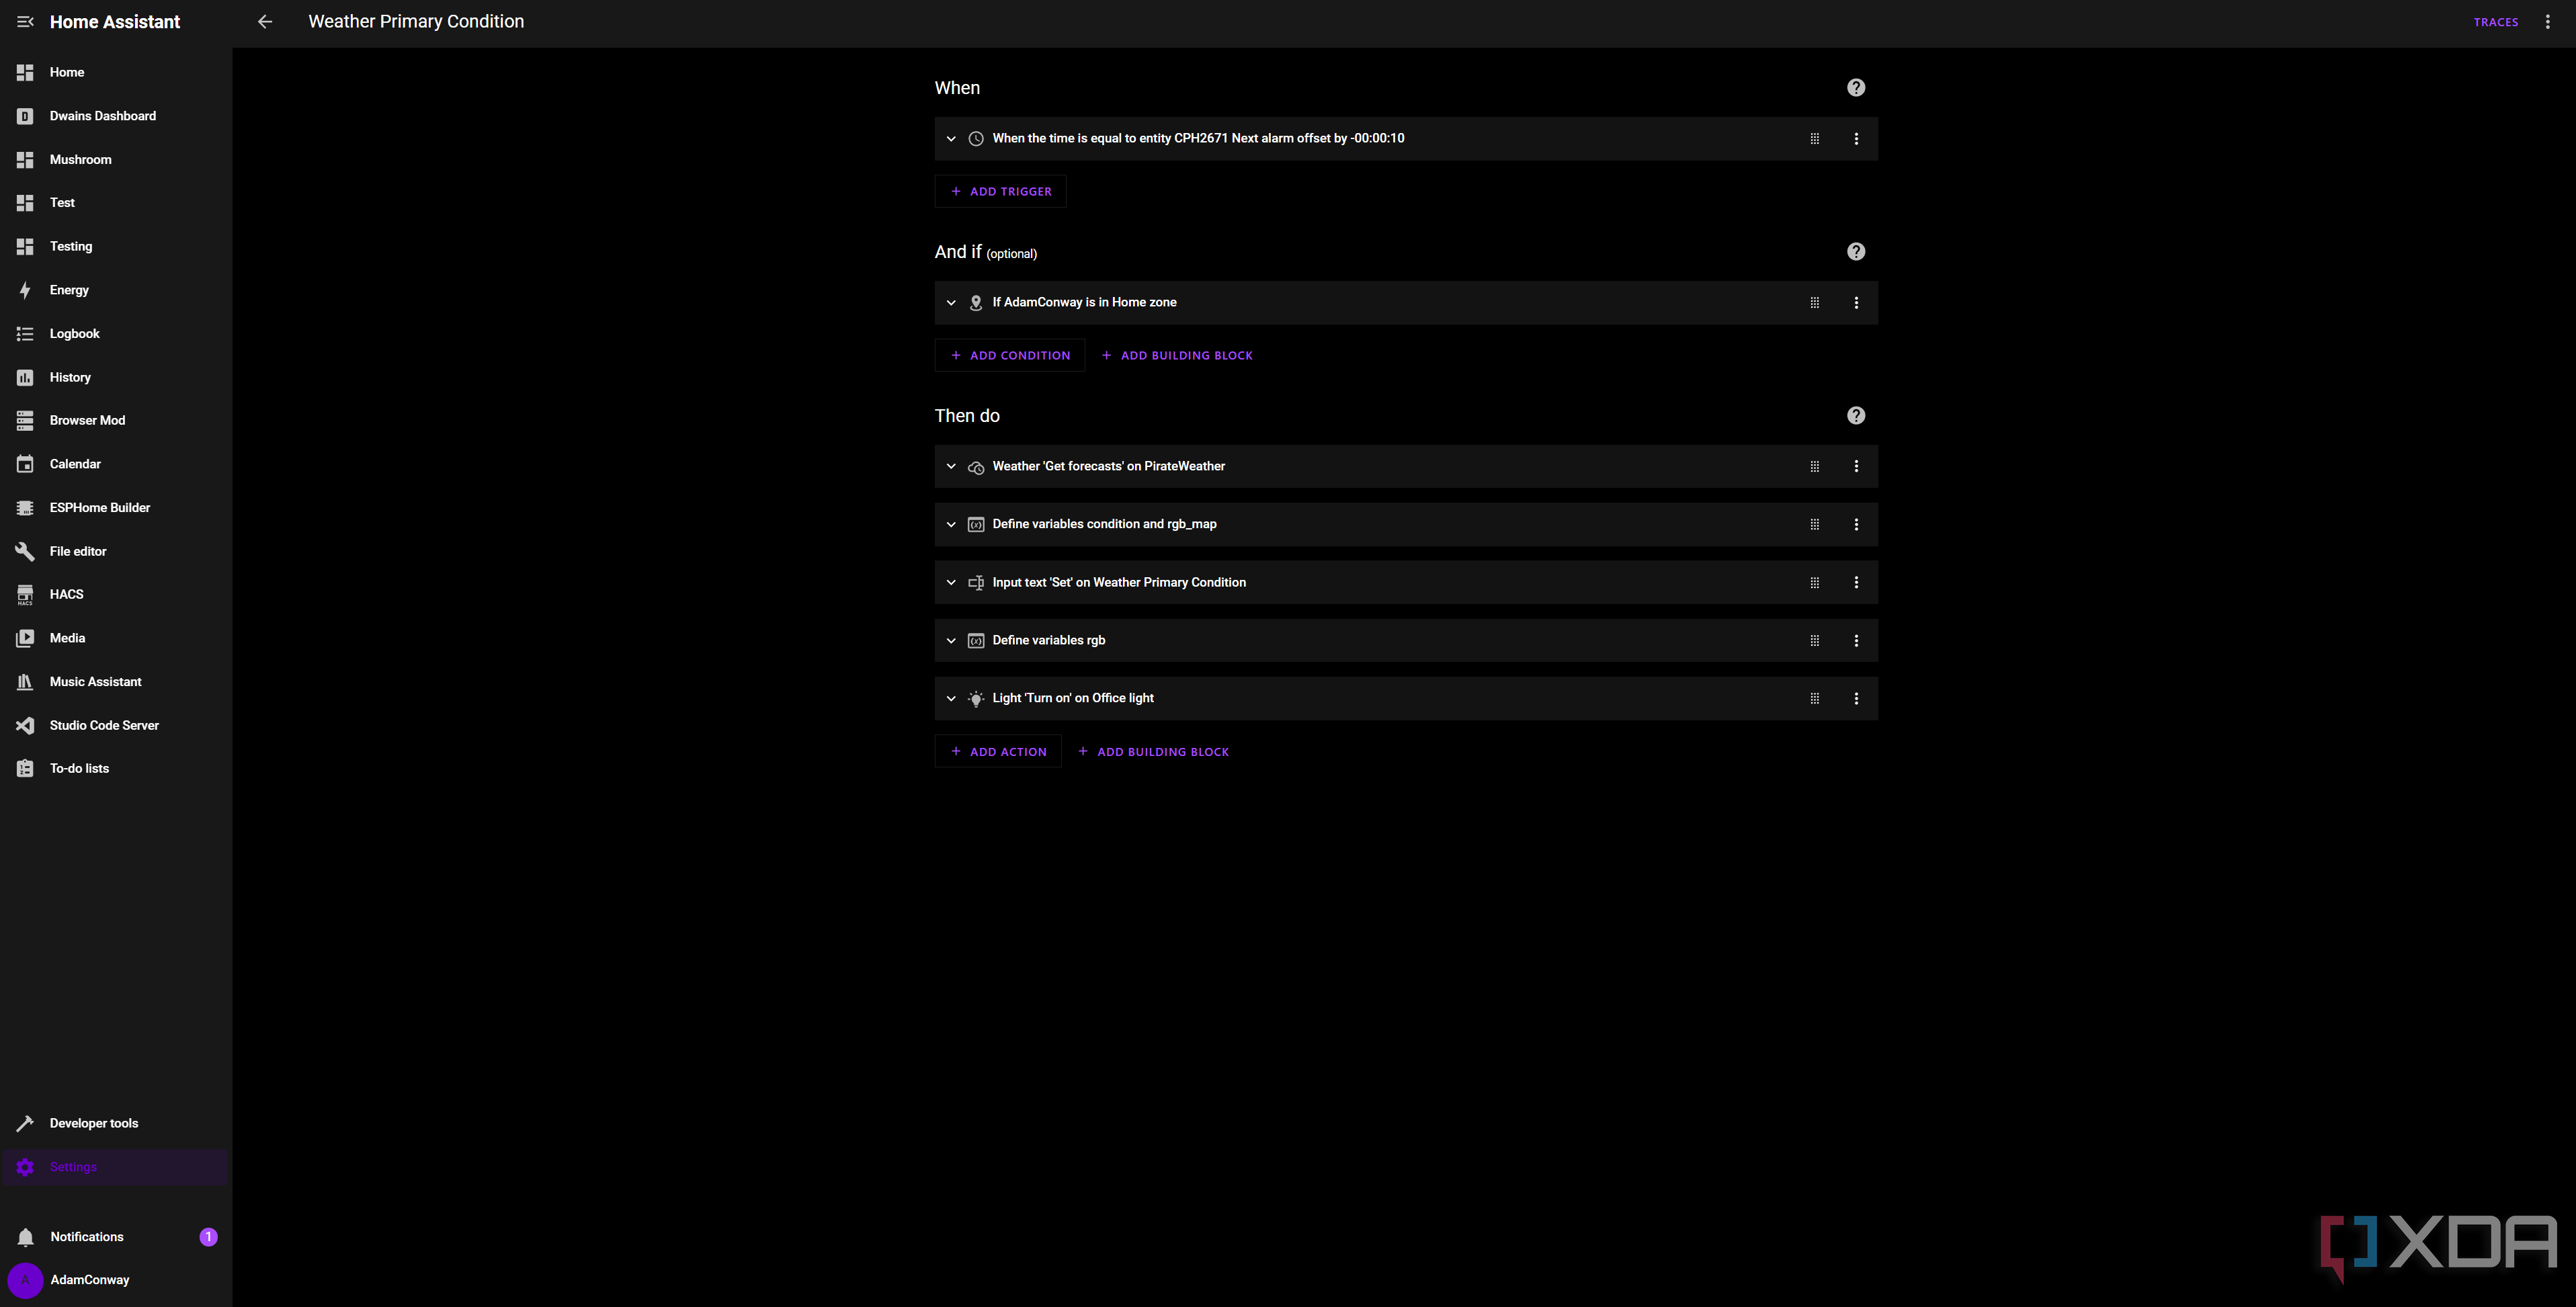
Firstly, think about what a good trigger for your automation would be. In my case, I just use my alarm, offset by minus ten seconds. It’s not necessary to do that, but I just like to do it personally. I also check if I’m at home, as otherwise, it would turn on my light in my bedroom even if I wasn’t at home. The full process, for me, triggered by my alarm offset, is as follows:
- Check if I’m home. If I am, then continue
- Get weather data from Pirate Weather, save it to a variable “wx”
-
Define two variables
-
condition: This takes the condition value for today’s forecast, ensures that it’s lowercase, and saves it to this variable. I use the following code:
{{ (wx['weather.pirateweather']['forecast'][0].condition if wx and
wx.get('weather.pirateweather') else 'unknown') | lower }} -
rgb_map: This defines a mapping for my RGB values based on condition, which we’ll use later. For example, the first section of it looks like this:
rgb_map:
sunny:
- 255
- 213
- 0
-
condition: This takes the condition value for today’s forecast, ensures that it’s lowercase, and saves it to this variable. I use the following code:
- Save “{{ condition }}” to my input text helper that I created earlier. For example, if the result of “condition” is “rainy”, then the input text helper will have a value that just says “rainy.” This will stay as this value until replaced, so you can look at it any time that day to see it.
-
Define a new variable, rgb
-
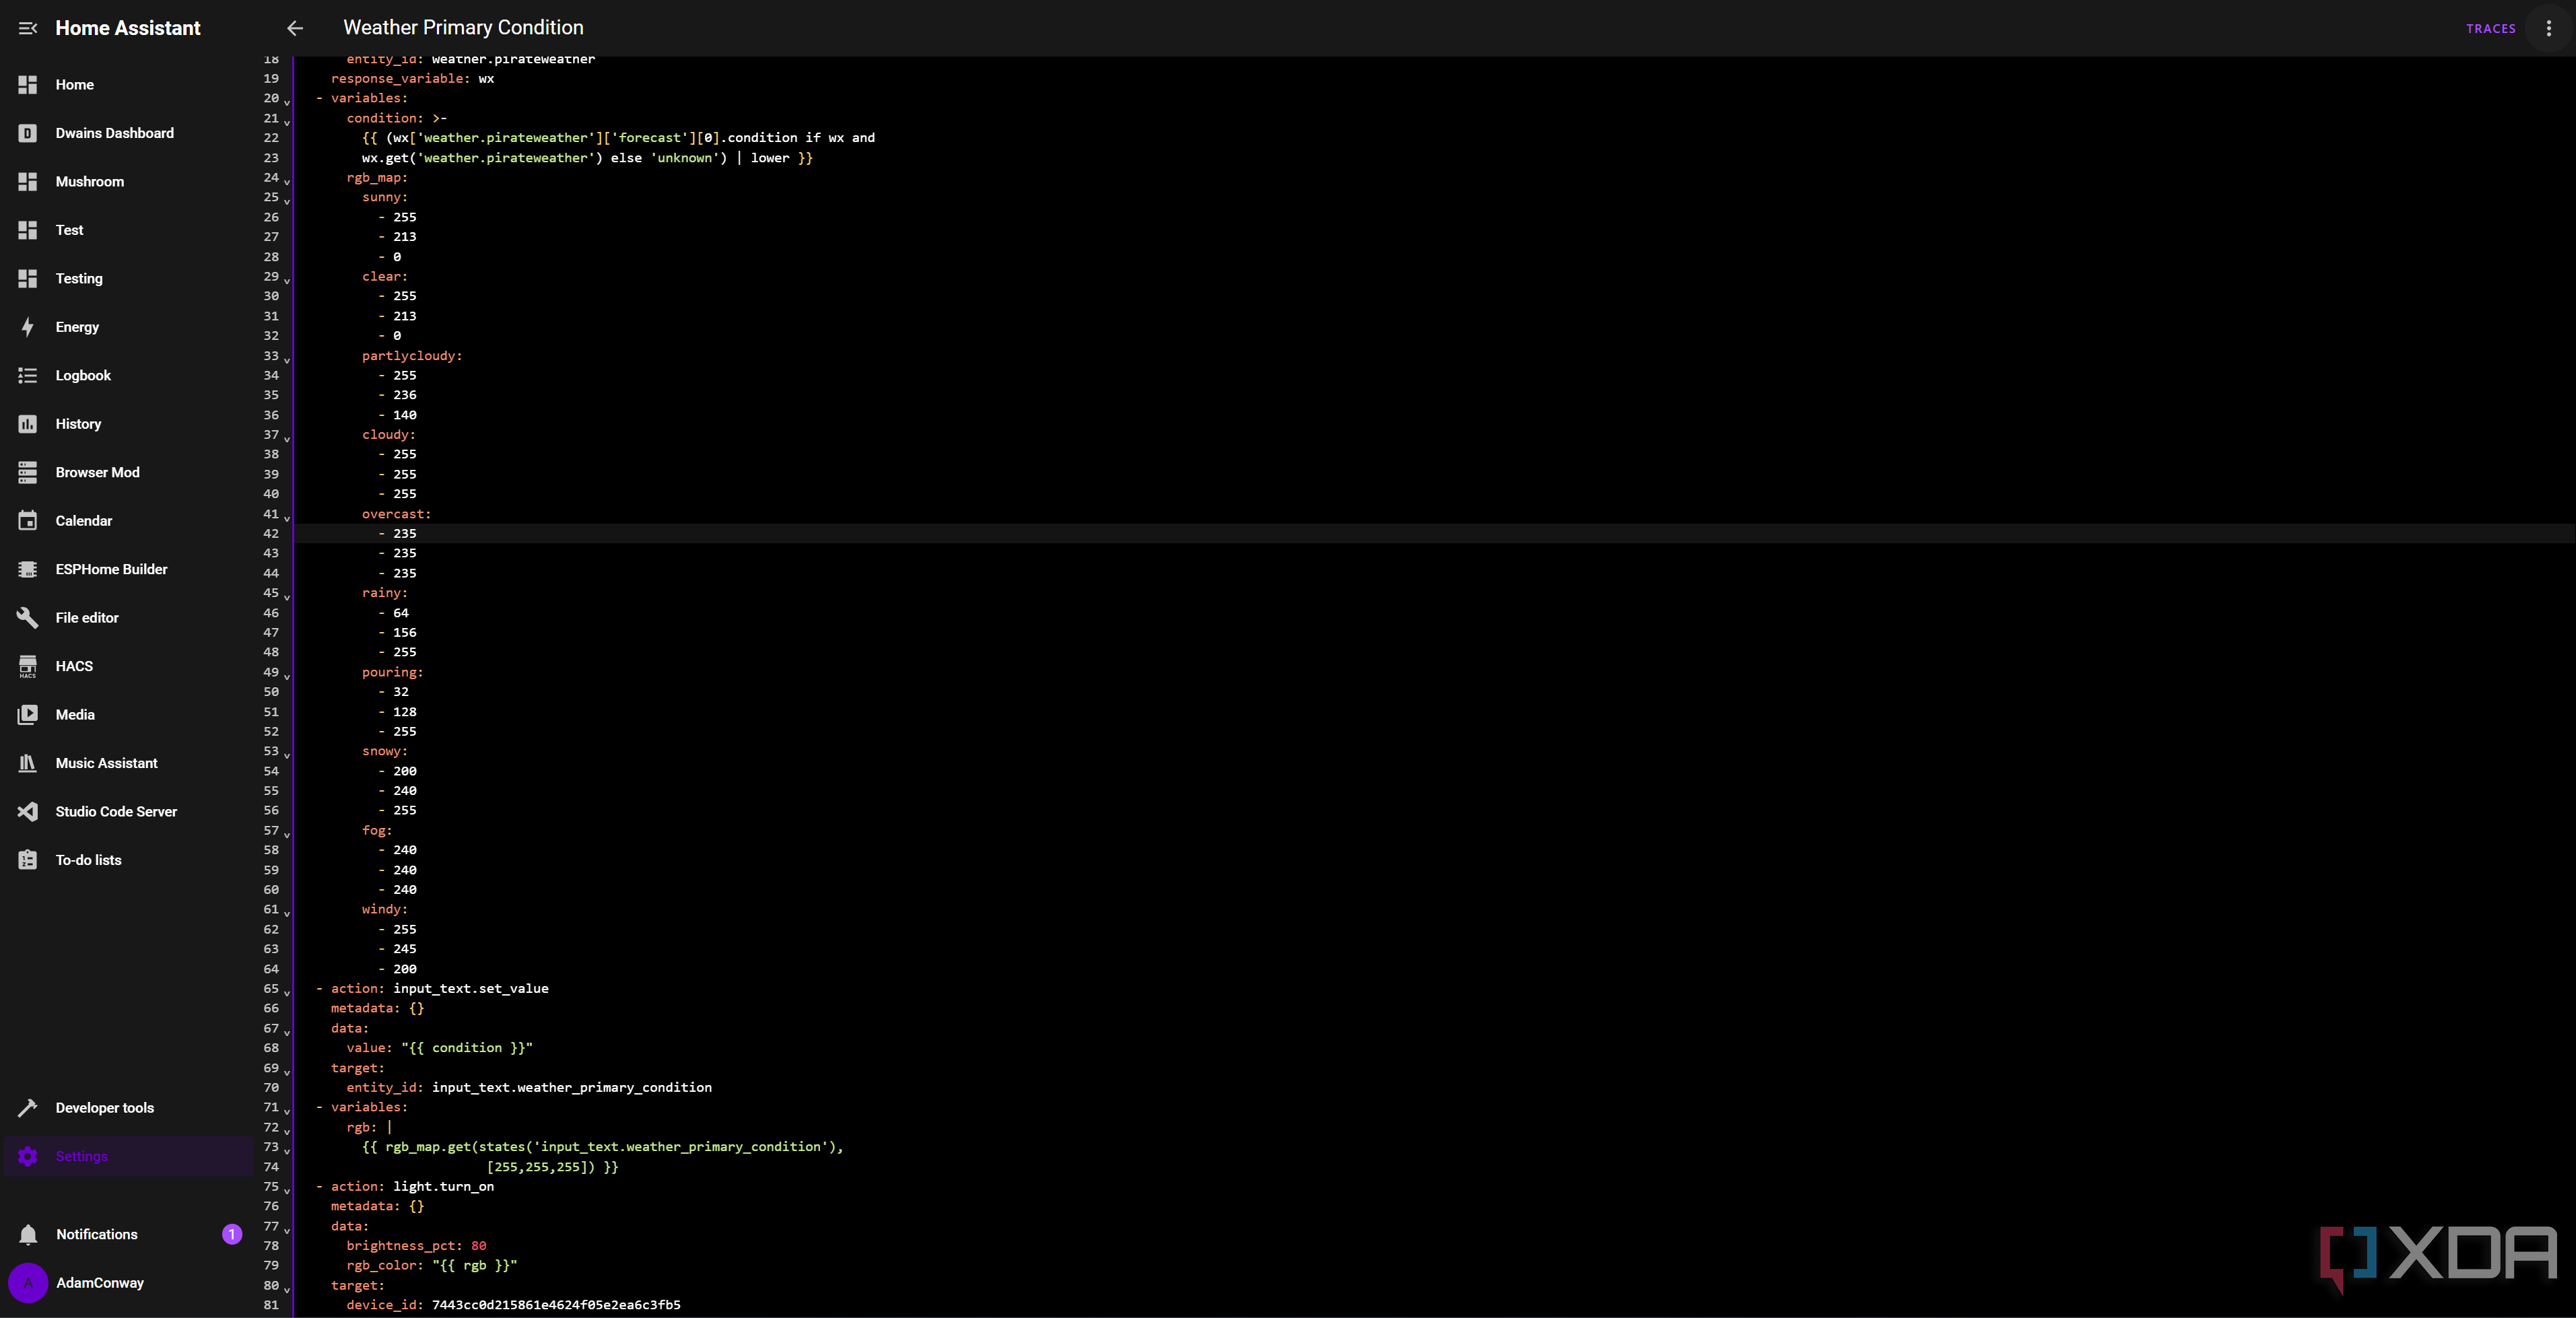
This gets the current value of our input text helper and matches it to the RGB map that we created. When it finds a match, it takes those numbers and saves them to the “rgb” variable. The code looks like this:
rgb: |
{{ rgb_map.get(states('input_text.weather_primary_condition'),
[255,255,255]) }}
-
This gets the current value of our input text helper and matches it to the RGB map that we created. When it finds a match, it takes those numbers and saves them to the “rgb” variable. The code looks like this:
- Turn on my light, with color set to “{{ rgb }}” and brightness set to 80%.
Most of this was built using the visual editor, but some parts, like the light color, were done using the YAML editor for that particular block. The above screenshot should show you what the format of the code should look like, so that you can look at it and modify it to your needs. It’s not too long, and it’s really easy to implement once you get the hang of working with input helpers.
As already mentioned, you don’t need to use this for a light. You could map that condition to any particular output or automation, and it’s whatever works for you. Maybe instead of turning on a light, it changes an item on a smart display, for example. You could also conditionally add notifications, so if it’s going to rain, you get a notification stating to wear a coat. Alternatively, if you can get UV values, you could then send a reminder to wear sunscreen depending on whether the UV will be high or not.
Home Assistant is everything that you make it. It may not be for everyone, and it can require a lot of work to create a system that’s truly yours, but it can be so worth it in the end. This has been a nice little upgrade to my smart home that makes it easier than ever to be aware of what the weather will be like for the day. I might eventually change it to turn on the light in my office (as it tends to be the first place I go in the day anyway) rather than being assaulted with a potentially bright white light first thing in the morning, but I’ll see.
For now, I’ve been loving this, and it’s versatile enough that it can be tweaked to apply to anything.

